Table of camera models Tool bar |

|

|

|

|

|
||
|
Table of camera models Tool bar |
|
|
|

|

|

|
Table of camera models
Tool bar
|
Table of camera models Tool bar |
|
|
|
|
|
||
|
Table of camera models Tool bar |
|
|
|
|
|
|
|
|
||
 |
| Click to expand |
Tool bars on All models tab and Used models tab differ a little. Differences are given below, in tool descriptions.
+Dupl (create copy of selected model) |
The ![]() ,
, ![]() buttons allow you to hide the toolbar.
buttons allow you to hide the toolbar.
![]() Allow/deny editing camera models
Allow/deny editing camera models
This button in the released position prohibits editing camera models. The ability to view and assign camera models remains.
|
Show the Camera Model Filter panel. Using the panel, you can filter camera models in the Model of active camera list and in the Table of camera models according to the selected criteria. If the filter is enabled, the icon on the button turns red
See more: Camera model filter See also: Filtering by parameter value, Graphics window> Camera model filter
|
Open the Camera model card box.
If the box is called from the Table of camera models, then the box dynamically displays the photo and the most important parameters of the camera model selected in the table (model name, camera type, key feature, sizes and resolution of the image sensor, lens focal lengths, view angles, distance of the built-in IR illumination, protection environment, supply voltage, manufacturer, vendor, cost).
See more: Camera model card See also: Graphics window > Camera model card, Table of cameras > Camera model card
|
Assign model selected in the table to the active camera. As a result of assignment, model parameters will be assigned to parameters of the active camera. Changing of some parameters of the active camera will be disabled or restricted according to model limits. If model from the All models tab is assigned it will be copied to the Used models tab.
By clicking on the arrow to the right of the button, you can open a menu where you can choose whether to close the Table of Camera Models after assigning a model to the active camera.
If the checkbox Default values for empty parameters is checked, then when the model is assigned to the active camera, the camera parameters that are not assigned values in the model will be assigned default values. Otherwise, empty (in the model) parameters of the active camera will be left unchanged.
To assign one model to all selected cameras, use pop up menu of the Model of active camera combo box on the Tool bar of the Graphics window.By selecting a model from the Active Camera Model list on the Graphics Window Toolbar, you can also assign this model to the active camera without opening the Table of Camera Model .
|
The button is present on the All models tab only.
Create a new blank row for the new camera model. After clicking this button a new line will be added to the table. You can enter parameters of the new model to the line.
For specifying parameter, click the cell of table twice with an interval not less half of second. To turn the selected cell to edit state press Enter.
Depending on type of parameter, the cells may allow the selection from a list, enter into a simple or complex drop-down form.
When clicking on a cell with a photo, the Сamera model card window appears with an enlarged photo, and instead of a drop-down list, a menu appears allowing you to cut, copy, paste, delete, load from a file or save a photo to a file.
It is convenient to move the focus on the cells using the arrow keys. If you press the "down arrow" on the bottom line, a new line will be created.
It is possible to copy fragments into the table from Excel table. At that the number of cells and data types should coincide.
See also. Parameters of camera model, Import of Camera Models to VideoCAD using MS Excel
|
+Dupl (create copy of selected model)
The button is present on the All models tab only.
Create a copy of the current row of the table. The current row is the one to the left of which the arrow is. Parameters in the new row can be edited.
For specifying parameter, click the cell of table twice with an interval not less half of second. To turn the selected cell to edit state press Enter.
Depending on type of parameter, the cells may allow the selection from a list, enter into a simple or complex drop-down form.
When clicking on a cell with a photo, the Сamera model card window appears with an enlarged photo, and instead of a drop-down list, a menu appears allowing you to cut, copy, paste, delete, load from a file or save a photo to a file.
It is convenient to move the focus on the cells using the arrow keys. If you press the "down arrow" on the bottom line, a new line will be created.
It is possible to copy fragments into the table from Excel table. At that the number of cells and data types should coincide.
See also. Parameters of camera model, Import of Camera Models to VideoCAD using MS Excel
|
+Mod (create modification of selected model)
The button is present on the All models tab only.
Create a copy of the current row of the table under the row. The current row is the one to the left of which the arrow is.
You can create modifications to the modifications, that is, the multi-level tree structure of camera models. Modifications allow to take into account different versions of the same camera models with different parameters, as well as different modes and combinations of model settings.
You can turn independent models into modifications, and modifications into independent models. See Moving Columns and Rows.
Parameters in the new row can be edited. For specifying parameter, click the cell of table twice with an interval not less half of second. To turn the selected cell to edit state press Enter.
Depending on type of parameter, the cells may allow the selection from a list, enter into a simple or complex drop-down form.
When clicking on a cell with a photo, the Сamera model card window appears with an enlarged photo, and instead of a drop-down list, a menu appears allowing you to cut, copy, paste, delete, load from a file or save a photo to a file.
It is convenient to move the focus on the cells using the arrow keys. If you press the "down arrow" on the bottom line, a new line will be created.
It is possible to copy fragments into the table from Excel table. At that the number of cells and data types should coincide.
See also. Parameters of camera model, Import of Camera Models to VideoCAD using MS Excel
|
Tabs (show camera parameters on tabs)
After clicking this button, the form of editing model parameters on tabs appears.
Editing camera model parameters directly in the Table of camera models can be more convenient.
The red highlighted parameters are used in camera modeling. The rest parameters exist only for information and comparison of different models.
If the Hide invisible parameters checkbox is checked, then only the parameters corresponding to the visible columns will be visible on the form. Otherwise, all the parameters will be visible on the form, but only the parameters from the visible columns will be available. After filling out the form, click OK.
It is possible to specify parameters not only in the special form, but also directly in the table of models. For specifying parameter, click the cell of table twice with an interval not less half of second. To turn the selected cell to edit state press Enter.
Depending on type of parameter, the cells may allow the selection from a list, enter into a simple or complex drop-down form.
When clicking on a cell with a photo, the Сamera model card window appears with an enlarged photo, and instead of a drop-down list, a menu appears allowing you to cut, copy, paste, delete, load from a file or save a photo to a file.
It is convenient to move the focus on the cells using the arrow keys. If you press the "down arrow" on the bottom line, a new line will be created.
It is possible to copy fragments into the table from Excel table. At that the number of cells and data types should coincide.
See also. Parameters of camera model
|
Delete model selected in the table. As a result of deleting model from the Used models tab, model assignment will be removed from cameras, to which the deleted model had been assigned.
|
The button is present on the Used models tab only.
Copy selected model from the Used models tab to the All models tab. If such a model already exists on the All Models tab, it is proposed to overwrite it.
|
Tools of the Data group operate the whole database of camera models, regardless of whether the data is visible or not.
The button is present on the All models tab only.
Save model database to a file.
When filtering is enabled, filtered table records can be saved.
Possible formats:
* .cdb - VideoCAD internal format compatible with previous versions; * .cdz - VideoCAD internal format. This is a data file * .cdb and photos of camera models (if they exist) packed in a Zip archive; * .cd2 - open text format. Data, table structure and photos of camera models recorded in one text file. Data saved in * .cd2 cannot be added to existing data, this format only supports full database replacement. The * .cd2 format stores not only data and photos, but also the table structure; * .cvs - comma separated values. The default delimiter is ';' can be changed in the Options box; * .txt - text file.
When selecting the * .cdb, *. Cvs, *. Txt formats, camera model photos are saved as graphic files in the save directory of the data file.
The preferred format for backup and creating your own database of camera models for distribution is * .cdz. If support of VideoCAD versions lower than 9.0 is required, then select * .cdb. The * .cvs and * .txt formats are offered for export, they cannot be opened in VideoCAD.
|
The button is present on the All models tab only.
Load model database from file.
VideoCAD will ask "Replace database of camera models?" If you choose "Yes" - VideoCAD will fully replace existing database by opened database. If you choose "No" - VideoCAD will merge existing database and opened database.
Possible formats:
* .cdb - VideoCAD internal format. When opening a file, photos of camera models are searched in the directory where the data file is located; * .cdz - VideoCAD internal format. This is a data file * .cdb and photos of camera models (if they exist) packed in a Zip archive; * .cd2 - open text format. Data, table structure and photos of camera models recorded in one text file. Data saved in * .cd2 cannot be added to existing data, this format only supports full database replacement. The * .cd2 format stores not only data and photos, but also the table structure;
See also:Import of Camera Models to VideoCAD using MS Excel
|
The button is present on the All models tab only.
Add model database from a file to VideoCAD model database.
VideoCAD will ask "Replace database of camera models?" If you choose "Yes" - VideoCAD will fully replace existing database by opened database. If you choose "No" - VideoCAD will merge existing database and opened database.
Possible formats:
* .cdb - VideoCAD internal format. When opening a file, photos of camera models are searched in the directory where the data file is located; * .cdz - VideoCAD internal format. This is a data file * .cdb and photos of camera models (if they exist) packed in a Zip archive;
Data saved in * .cd2 cannot be added to existing data, this format only supports full database replacement.
See also:Import of Camera Models to VideoCAD using MS Excel
|
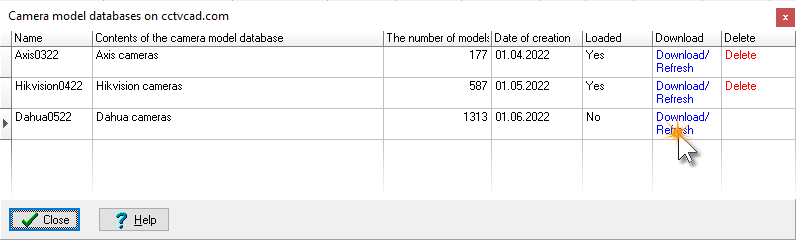
![]() Download (databases of camera models from cctvcad.com)
Download (databases of camera models from cctvcad.com)
Calling a window with a Table of databases of camera models located on the site cctvcad.com. You can copy these databases to your local database of camera models available on the All models tab of the Table of Camera models.
To add camera models from the selected database to the local database of camera models, click Download/Refresh. To remove models belonging to a certain database from the local database of camera models, click Delete.
To add only certain models from the selected database:
1. Add the entire database (Download/Refresh). 2. In the Table of Camera Models, duplicate the models you need. 3. Delete the entire database (click Delete).
This item is duplicated as the
See also: Database of real camera models, Adding a camera model to the Camera model database
You can order special Camera model database add-on file, including parameters of user-defined models, entered according to their specifications.
|
Tools of the Table group operate the visible table.
Export table of camera models to any of the following formats: *.txt, *.csv, *.htm, *.rtf, *.xls, OLEXLS, *.xlsX, *.xml. File format can be chosen in Save as dialog box appeared. If OLEXLS is selected, MS Excel opens (if installed) into which the exported table is loaded.
You can export selected fragments using pop-up menu.
|
Import table of models from formats: text and unicode text. The file format is selected in the open file dialog. It is convenient to import data through the clipboard, by copying tables or table fragments from MS Excel and pasting camera models into the Table.
|
Print full table of camera models or a selected fragment of the table. Print dialog box will open in which it is possible to adjust printing options. |
View - is a set, width and order of visible columns. In the table there are more than hundred parameters by which it is possible to describe the majority of security cameras existing at the moment of VideoCAD release. In real projects there is no necessity to use all parameters. At various times different parameters sets are necessary. You can hide unnecessary columns, place the rest columns in required order and save obtained view. After that at any moment you can restore the saved view (i.e. set and order of visible columns).
The list contains Default Views. By selecting the desired View, you can immediately get a set of parameters ready for a specific task. You can edit default views and create your own views based on them.
The views of the Table of Camera Models are used to set the set, order and column widths for the Table of Camera Models in the PDF report.
|
Compress columns so that the table is placed completely on the screen or restoring normal width of columns.
|
Hide selected columns.
See also: Visibility of Columns
|
Show all columns including hidden ones.
|
Save current table view. Dialog box will open, in which it is necessary to enter view name. It may be a name of an existing View or a new name. The new name will appear in the Table view list.
|
In the list there are all earlier saved views of the table. To load a view, just choose its name in the list.
|
Delete the view, the name of which is displayed in the Table view list.
|
See also: Table of camera models, Table interface, Pop-up menu, Parameters of camera model.Database of real camera models, Adding a camera model to the Camera model database