Positions of active camera/Multisensor |

|

|

|

|

|
||
|
Positions of active camera/Multisensor |
|
|
|

|

|

|
Positions of active camera/Multisensor
|
Positions of active camera/Multisensor |
|
|
|
|
|
||
|
Positions of active camera/Multisensor |
|
|
|
|
|
|
|
|
||
Graphics window Toolbar
|
|
Positions are copies of cameras that can be saved and loaded to the parent camera. Position includes almost all camera parameters, not just its position. The number of positions of each camera is not limited.
Positions can be displayed simultaneously with the parent camera in the Graphics window and the 3D World window.
Images from positions can be displayed simultaneously in the 3D Video window, loaded to the Monitors, included in the PDF report.
The use of the positions is various. Here are some examples:
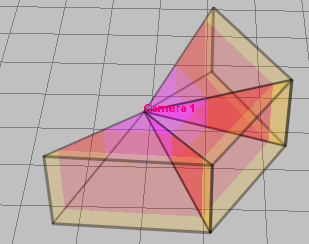
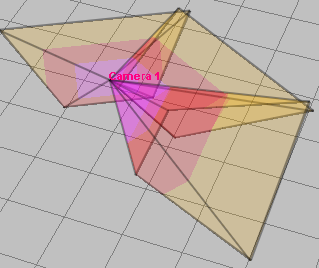
| • | Modeling multisensor cameras. You can use positions instead or together with Groups. |
| • | Modeling PTZ cameras. You can simultaneously display several presets of a PTZ camera and a common control area. You can display presets in the 3D Video with image dividing. It is convenient to switch between presets. |
| • | Modeling Fisheye cameras. You can display several dewarped fragments from a Fisheye camera with real camera resolution on one image. |
| • | Selection of placing and camera parameters. To study and demonstrate the difference between positions, camera models or camera settings, you can save the camera settings into positions and then activate these positions one by one. |
The panel can be stretched horizontally and vertically by the mouse.
You can drag the rows of camera positions with the mouse on the left edge. The order of camera positions in the table determines the order of displaying images from positions in the 3D Video window.
Positions have the following parameters, which can be quickly changed by noting checkboxes in the table or editing values:
Positions are named automatically. To rename select the cell with name by the mouse and type a new name. A single click on this cell selects a position in the table. At the moment of the click, the position is highlighted in the Graphics window and the 3D World window.
Double clicking on this cell copies the position to the active camera, similarly to the button Pos>Cam.
Be careful! when copying a position, the parameters of the active camera will be replaced by the position parameters.
|
The position is visible in the Graphics window.
|
The position is displayed in gray in the background.
|
If you set the Highlight greater than zero, the position is displayed in a more saturated color. If you set the Highlight less than zero, then the position is displayed less saturated, faded.
|
The position is visible in the 3D World.
|
The position will be included in the Table of cameras.
|
After loading images from the parent camera to the Monitors window, images from the positions with selected Monitor cell will be loaded. Images from positions with the Monitor cell marked will be displayed in the 3D Video window with screen division if the Positions> Show switch is in the Positions or Cam + positions.
|
Paint position by specified color. Filling of camera view areas is colored only if the Pixel density visualization of this camera is disabled. White color means no special color.
|
Below there are two tabs with tools:
Buttons on the Positions panel:
Add - add a position and copy parameters of the active camera to it.
Del - delete the position selected in the table.
<< >> - buttons allow you to sequentially copy positions in the table to the active camera.
Refresh Shadows – recalculate shadows of positions of the active camera in the Graphics window. If the 3D World window is open, the shadows will be recalculated in it as well.
See also: Recalc., Recalculate shadows
CAM>POS - Copy all parameters of the active camera to the position selected in the table.
Be careful! when copying, position parameters will be replaced by active camera parameters.
POS>CAM - Copy a position selected in the table to the active camera. Beforehand select a position in the table by a single click .
Be careful! when copying, the parameters of the active camera will be replaced by the position parameters.
You can also copy a position to the camera by double-clicking on the line with the position.
Options for all active camera positions
Combine - positions combined with the active camera are at the same point as the parent camera. Combined positions will be selected, moved, copied with the camera. When positions are selected together with the camera, you can control the view of the view areas of all positions simultaneously using the buttons of the "View" button group on the Toolbar. You can assign the same Camera model to all positions, change the parameters of all positions at the same time, as you can change the parameters of all selected cameras using the Assign to selected cameras item of the context menu of the boxes with camera parameters.
Combined positions can be displayed simultaneously in the 3D Video window. Combined positions are suitable for modeling multisensor cameras, presets for PTZ cameras and Fisheye camera dewarped fragments. If this checkbox is not checked, then the position locations are not tied to the active camera. Not combined positions can be used to store and compare different placement options and parameters of the same camera.
Show Names - displays position names.
Show icons - display camera icons at the positions.
Close - close the panel.
|
The tab contains special tools for modeling multisensor cameras using positions. For the active camera to be considered multisensor, check the Multisensor camera checkbox. If the camera is multisensor, the Lens focal length box and the button on the Toolbar are colored Yellow
Sensors in line - the number of image sensor + lens modules in each line of the multisensor camera. Most cameras have modules in only one line. In this case, it is the number of sensor modules in the camera.
Order of sensors - the order of direction of sensor modules:
Angle of sensors - horizontal angle between sensors in a horizontal line. It is recommended to choose Auto - VideoCAD will calculate the angle itself so that the view areas of neighboring sensors intersect without formation of dead zones.
Hide nonselected parent camera - make the parent camera invisible if it is not selected. Selected parent camera will remain visible.
After automatic creation of the modules, they can be edited as usual camera positions.
Editing position (in space) of a multisensor camera consists of two steps: 1. Editing the position (in space) of the active camera. If necessary, edit the parameters Number of sensors in line, Order, Angle between sensors, Additional lines (up / down). 2. Click on the Update sensors button.
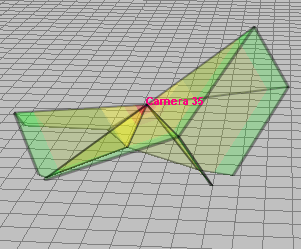
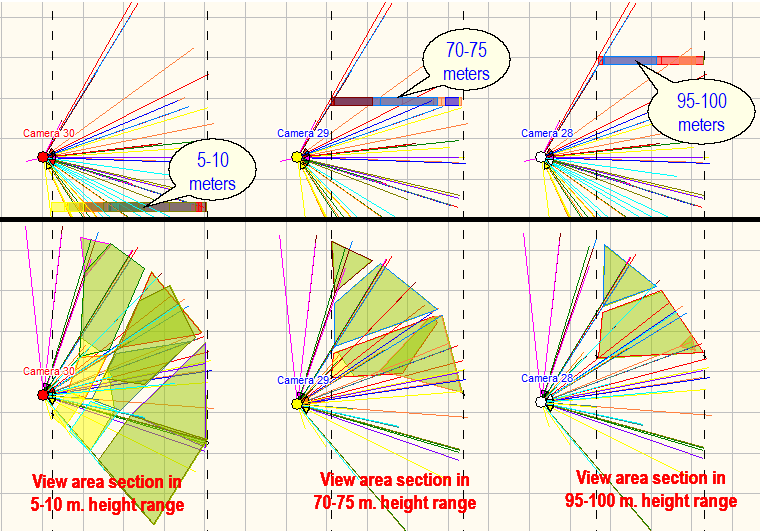
View area upper bound, View area lower bound The bounds of view area in height for constructing horizontal projections (sections) of view areas of multisensor cameras, are set regardless of the position of the active camera, which makes it possible to obtain view area projections in any range of heights.
If you need to set the view area bounds by height independently for each sensor, then do not use the Add sensors and Update sensors buttons, but use only the tools on the Positions tab.
|
See also: Modeling multisensor camera, Modeling Fisheye camera, Camera parameter panel>Panoramic, Camera model parameter>Number of sensors, Camera Groups.