VideoCAD

Simulating distortions of moving objects arising from Exposure time, Interlace scan and Rolling shutter

Hide Navigation Pane

Simulating distortions of moving objects arising from Exposure time, Interlace scan and Rolling shutter

Previous topic Next topic No directory for this topic Expand/collapse all hidden text  

Simulating distortions of moving objects arising from Exposure time, Interlace scan and Rolling shutter

Previous topic Next topic Topic directory requires JavaScript JavaScript is required for expanding text JavaScript is required for the print function Mail us feedback on this topic!  


Problem


There are three cameras:

Three-megapixel (3MP) (2048x1536) IP camera with CMOS sensor and Rolling shutter;
1.3 megapixel (1280x960) IP camera with CCD sensor and Global shutter;
0.4MP (768x576) analog camera with interlace scan.

We know camera exposure time at the scene light conditions.

3MP IP Camera - 100ms;
1.2MP IP camera - 50ms;
analog camera - 20ms (PAL).

3MP camera employs Rolling shutter, the period between start reading successive rows ( Row time) = 50 microseconds.

All cameras have the same sensor size 1 / 3 "and a lens with a focal length = 4mm.

We know camera position, location and speed of moving objects on the scene.


We need to get the model images of moving objects from each camera at the same position and compare them.


See also: Measuring exposure time of IP camera, Measuring rolling shutter row time of IP camera


Order of work


       1. Construct 3D model of the scene, place and adjust cameras


Place the 3D models at the expected locations of moving objects. See Example.


       2. Specify velocity vectors for the moving 3D models according to expected speeds and directions of moving objects


double click on the 3D model to switch it to editing state;
on the appeared Current construction parameter panel type a nonzero velocity value (in meter(foot) per second) into the Speed box.


You can edit the velocity vector of 3D model in editing state by moving its terminus.


Bring the cursor to the terminus of the velocity vector, click the left mouse button and drag the terminus. At the same time the speed value and direction of movement is being edited simultaneously. Click for the second time to specify new velocity and finish editing.


If 3D model is selected then length of the velocity vector equals to the distance in meters (feet) which the 3D model passes per second (crimson arrow).

If 3D model is in the normal state, the length of the velocity vector equals to the distance which the 3D model passes for the period between successive frames of the active camera (black arrow).


       3. Modeling image from three-megapixel (3MP) IP camera


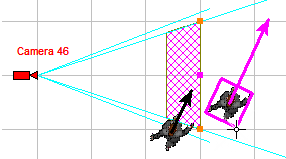
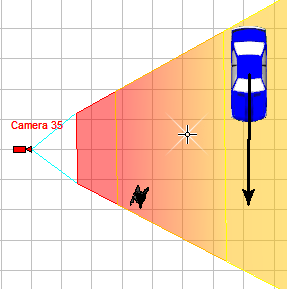
3.1 Create and place a camera at the appropriate position.

3.2 Open the Camera Geometry  box and specify: image sensor format - 1/3", lens focal lehgth - 4mm, aspect ratio - 4:3. Then close the box.

3.3 Open the Sensitivity and resolution box and specify numbers of pixels horizontal - 2048 , vertical - 1536. Close the box and save changes.

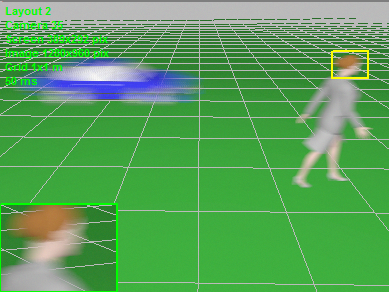
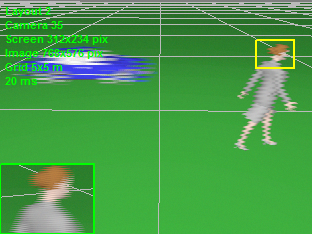
3.4 Open the 3D Video . Stretch the 3D Video for better resolution if needed.  Enable image processing,if it is disabled.


If the PiP mode is enabled (by default) in the 3D Video a yellow rectangle will be displayed. And in the corner of the 3D Video, inside a green rectangle, a image fragment from the yellow rectangle will be displayed.

Pay attention that the entire frame is shown with a resolution lower than specified  2048x1536 and only the fragment from the yellow rectangle is shown with the actual resolution  2048x1536.


Place the yellow rectangle on the moving 3D model, by clicking the middle mouse button (wheel).


For detail about PiP, see: PiP.


3.5 By right clicking on the 3D Video, open the Image parameter panel.

3.6 Choose the Camera tab. Uncheck the According to the camera parameters box if it is checked.

Choose '100' in the Exposure (ms) combo box. Check Model perm. on the Exposure (ms) panel.

Choose '50' in the Rolling shutter combo box. Check Model perm. on the Rolling shutter panel.


During the image generation in the 3D Video on the 3D Video button red frame flashes ..  Simultaneous modeling exposure and rolling shutter can take several minutes. After a while you will see the image model.


You can adjust realism of modeling exposure and rolling shutter on the 3D tab of the Options box. The more realistic simulation is, the more time required to generate the images in the 3D Video.


3.7 Save the image in the 3D Video: 3D Video>Main menu>Save as *.png


       4. Modeling image from 1.3MP IP camera


4.1 Open the Sensitivity and resolution box and specify numbers of pixels horizontal - 1280 , vertical - 960. Close the box and save changes..

4.2 Open the 3D Video .  Enable image processing,if it is disabled.  Place the yellow rectangle on the moving 3D model, by clicking the middle mouse button (wheel).

4.3 By right clicking on the 3D Video, open the Image parameter panel.

4.4 Choose the Camera tab. Uncheck the According to the camera parameters box if it is checked.

Choose '50' in the Exposure (ms) combo box. Check Model perm. on the Exposure (ms) panel.

Choose '0' in the Rolling shutter combo box. Clear Model perm. on the Rolling shutter panel.


After a while you will see the image model.


4.5 Save the image in the 3D Video: 3D Video>Main menu>Save as *.png


       5. Modeling image from 0.4MP analog camera


5.1 Open the Sensitivity and resolution box and specify numbers of pixels horizontal - 768 , vertical - 576. Close the box and save changes..

5.2 Open the 3D Video .  Enable image processing,if it is disabled.  Place the yellow rectangle on the moving 3D model, by clicking the middle mouse button (wheel). .

5.3 By right clicking on the 3D Video, open the Image parameter panel.

5.4 Choose the Camera tab. Uncheck the According to the camera parameters box if it is checked.

Choose '20' in the Interlace.combo box. Check Model on the Interlace.panel.

Choose '20' in the Exposure (ms) combo box. Check Model perm. on the Exposure (ms) panel.

Choose '0' in the Rolling shutter combo box. Clear Model perm. on the Rolling shutter panel.


After a while you will see the image model.


5.5 Save the image in the 3D Video: 3D Video>Main menu>Save as *.png


6. Here are the obtained images below. In the frame there is a car moving at a speed of 20 m/s (72 km/h) and a woman moving at a speed of 2 m/s (7,2 km/h)/


See also: Measuring exposure time of IP camera, Measuring rolling shutter row time of IP camera

External link: "The principles of CCTV design in VideoCAD. Part 5. Video surveillance of moving objects"(*.pdf)