Choosing install location for PTZ camera |

|

|

|

|

|
||
|
Choosing install location for PTZ camera |
|
|
|
|

|

|
Choosing install location for PTZ camera
|
Choosing install location for PTZ camera |
|
|
|
|
|
||
|
Choosing install location for PTZ camera |
|
|
|
|
|
|
|
|
||
Problem
We have a three-dimensional model of a complex environment. We should choose the best install location for PTZ (dome) camera so that the areas you want to monitor, should be not shaded by objects of the environment.
Order of work
1. Construct three-dimensional model of the environment using the tools of 3D modeling.
The constructions must be drawn by line types with marked Shadow box.
You can import the environment or its fragments in the form of one or several 3D models imported from other graphics formats using Autodesk 3ds Max or SketchUp.
See: Importing 3D models from SketchUp and Autodesk 3ds Max
If the environment contains 3D models, shadows from which must be taken into account, you must:
| • | enable calculation of shadows from 3D models in the Options box; |
| • | individually switch these 3D models into the editing state by double-clicking, then mark the Shadow box on the Current construction parameter panel. |
2. Place the PTZ camera preliminary. Activate it.
3. Choose Dome ![]() in the drop-down menu of the Shadow
in the drop-down menu of the Shadow ![]()
![]() button on the Tool bar.
button on the Tool bar.
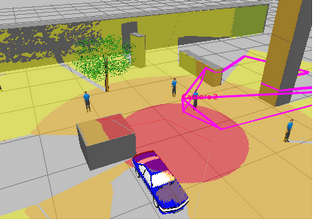
After a while VideoCAD calculates the control area projection, taking into account shadowing from all obstacles in environment.
In the Dome mode all shaded areas from the specified camera position become visible.
The Dome mode is also useful for choosing the best installation place for fixed cameras to make required areas reachable for the cameras. |
|
In the 3D World in the Dome mode the territory controlled by the active camera is displayed as coverage on the environment. The coverage in the 3D World is displayed for the active camera only.
Coverage calculations in the Dome mode requires a lot of computing resources. To increase speed of image refresh, reduce the Resolution of calculating the coverage. |
|
4. By moving the camera between the possible installation locations, choose the best location in terms of control required areas.
You can add several cameras and instead of moving, to hide and show different cameras.
See also: Modeling PTZ camera, PTZ or Fisheye, Shadows,Main menu>View>Calculate shadows for active camera, Main Menu>View>Recalculate shadows,Line type>Shadow, Layers>Shadow, Options box>Miscellaneous>Shadow, Options box>Calculate shadows from 3D models, Current construction parameter panel>3D model>Shadows, 3D Models window>Shadows, Choosing the best place for PTZ (dome) camera, Visualization of the camera control area projections and pixel density within them